Configuring OAuth Authentication for Microsoft 365
Using OAuth when authenticating requests when fetching emails from Microsoft 365
Prerequisites
-
Microsoft Azure Active Directory account configured
- The FP16 Patch 1 installed. For instructions, see SAP Note 2933871.
Incoming Servers
If you want to use OAuth authentication for the incoming email server, configure it in according to the table below:

|
Field |
Description |
|---|---|
|
Name |
Enter the name for the incoming e-mail server. There are no restrictions regarding the name. The names are displayed when you choose the server for an e-mail queue during queue configuration. |
|
Address |
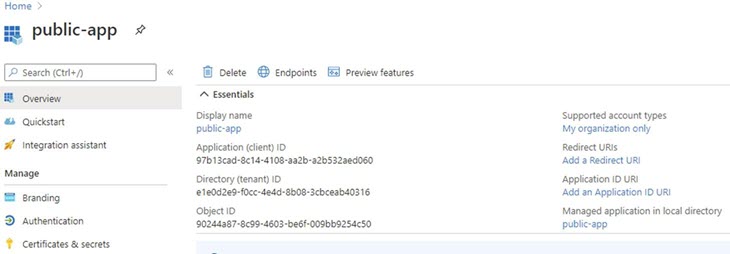
Enter the login address with the tenant ID. The address is of format https://[login address]/[tenant ID, which is a GUID, copied from Azure AD portal]. For example: https://login.microsoftonline.com/[tenant ID] You get the tenant ID from the Overview page of Microsoft Azure Active Directory. |
|
Authentication Type |
Choose whether the authentication is for a user (OAuth User) or a server (OAuth Service). |
|
Client ID | Enter the Application (client) ID value from Microsoft Azure Active Directory  |
|
Secret | This is needed for the OAuth Service.
Otherwise, anyone can access it. The secret is not needed for OAuth
User because password is required for the queue number. There is no
password in OAuth Service for the queue number and application
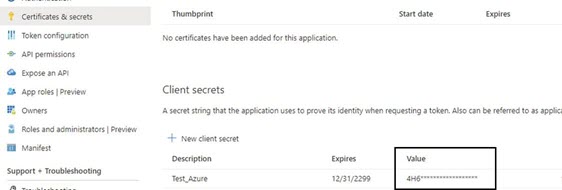
registration should be protected at application registration level with the secret. Enter the mail server secret from the Value column in Microsoft Azure Active Directory. 
|
Outgoing Servers
If you want to use OAuth authentication for the outgoing email server, configure it in according to the table below.
| Field | Description |
|---|---|
| Enable External Outgoing Mail Server | To use an external server, select this option. |
| IP Address or Name of Mail Server | Enter the tenant ID of your Office365 system. This is a GUID or a domain name. |
| Authentication Type | To use OAuth authentication, choose the option OAuth Service. |
| Server User | Enter the GUID of the user using the mailbox. |
| Set Password | To enter the password of the mailbox user, select this option. |
| Password | Enter the password. |
Queue Configuration
Go to and create an email queue as instructed in Creating Queues in Contact Center 365. In the Numbers/Addresses block, enter the following:
| Field | Function |
|---|---|
| Address |
Enter the full email address you defined in https://admin.microsoft.com/Adminportal/Home#/homepage during mailbox configuration. For OAuth user, it is the user email address. For OAuth server, it is the email address of the shared mailbox. |
| Priority Optional |
Enter a value that defines how quickly the contact should be answered in regard to other contacts (the lowest value has the highest priority). For example, queue A has the priority value 5 and queue B has the value 10. The calls from queue A are allocated first. For more information, see Priority. This value overrides the value in the Priority field in the Contact Management block. |
| Extension Language Optional |
Choose a language if it differs from the system default value, or if you want to offer service in various languages. If you have chosen a queue language (in ), the extension language value overrides the language value of the queue. |
| E-Mail Account | Enter the account name that is used when the mailbox folder is read. |
| E-Mail Password | This is required for OAuth user. Enter the password that is used when the mailbox folder is read. |
| Sender Optional | Select this option if you want that the e-mail account can be used as a sender. |
| E-Mail Server |
Enter the incoming mail server name and IP address by choosing the edit icon and by searching for the correct server. Incoming mail servers are defined in . |
For other queue-related settings, see the corresponding sections in Creating Queues.
