Before you start
Before configuring an event driven integration (EDI) for chat attachment upload, make sure you have the following configurations in place in System Configurator.
Authentication
Chat attachment upload uses Sinch Contact Pro's orchestration layer. To get access to it, please contact Sinch support. Support will add a secret in Secrets manager with name orchestration-layer.
Chat attachment upload user for Contact Management Interface (CMI)
Add a user for CMI to upload chat attachments:
-
Go to and click Add New.
-
Enter a first and last name and add the user to a user group. Select All Users if none of its subgroups are relevant.
-
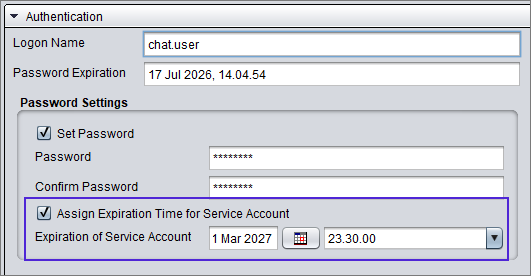
Go to . Enter a password for the user.
Do not use:
-
letters that aren't part of the Latin alphabet (for example, Scandinavian letters and umlauts)
-
the following special characters: ¤,£,€,½,§
Select Assign Expiration Time for Service account and define an expiration time for the service account user.
-
-
Go to .
-
Give the user these rights to upload chat attachments:
-
Manage Contact History rights to the chat queue from which you want to upload attachments. Note that rights are typically given for a queue group instead of a single queue:
For a queue group:

For a single queue:

-
Secrets in Secrets manager
Add credentials for accessing your CMI and RI:
-
Go to and click Add New.
-
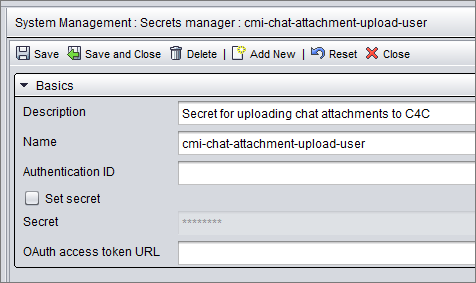
Enter the details for your CMI attachment upload user:
-
Description: Describe what this secret is used for.
-
Name: We recommend using the same name (cmi-chat-attachment-upload-user) as in this example so you'll be able to use the example JSON on the following pages without editing this part. If you define a different name for the secret, you'll just need to change the name in your JSON configurations.
-
Secret: Enter the password of the CMI chat attachment upload user user you just created.
-
-
Save your changes.
-
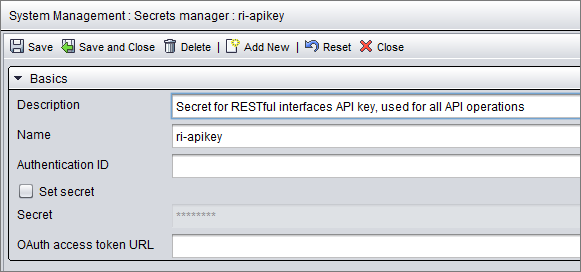
Click Add New and enter the details for your RI access:
-
Description: Describe what this secret is used for.
-
Name: We recommend using the same name (ri-apikey) as in this example so you'll be able to use the example JSON on the following pages without editing this part. If you define a different name for the secret, you'll just need to change the name in your JSON configurations.
-
Secret: Enter the API key used for accessing your RESTful interfaces.
-
-
Save your changes.