Configure chat attachment upload
To implement chat attachment upload, you'll need to create a technical user in SAP Service Cloud (C4C) and add an event-driven integration in System Configurator.
Create a technical user in SAP Service Cloud (C4C)
First define a communication system if you haven't done that previously. For instructions, see the Service configuration document.
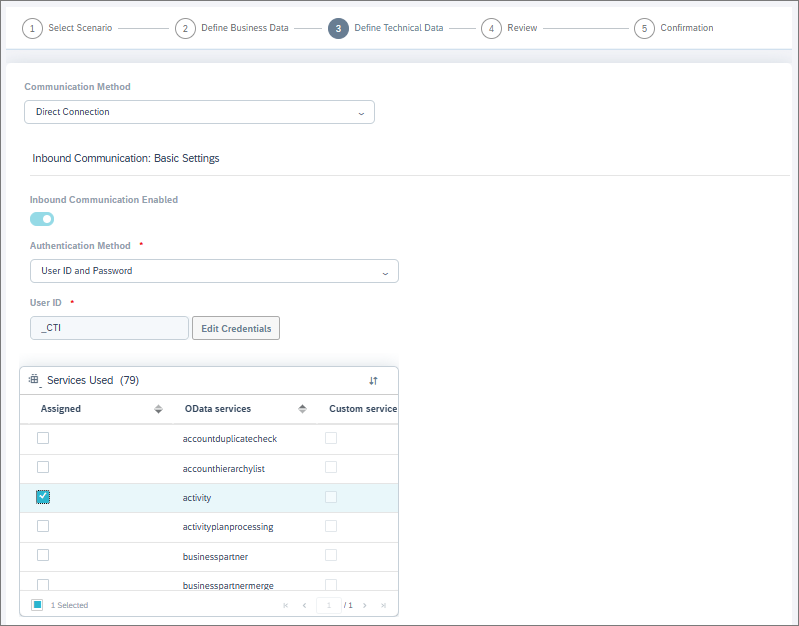
Define a communication arrangement:
-
In SAP Service Cloud (C4C), go to .
-
To create a new arrangement, click New.
-
In the Communication Scenario field, select OData Services for Business Objects and click Next.
-
In the Communication System field, select the communication system you created or had defined previously.

-
In the Authentication Method field, select User ID and Password (basic authentication).
-
In the User ID field, enter an ID for the user.
-
To set up a password for this integration user, click Edit Credentials and enter a password.
Do not use:
-
letters that aren't part of the Latin alphabet (for example, Scandinavian letters and umlauts)
-
the following special characters: ¤,£,€,½,§
-
-
In the Services Used field, select these OData services:
- activity
- chatactivity
- call_list
- socialmediaactivity
-
To complete the arrangement, click Next and then Finish.
The technical user's credentials (user ID and password) are now ready for use in your event-driven integration's JSON configuration.
Add a secret in System Configurator for the C4C technical user
-
In System Configurator, go to .
-
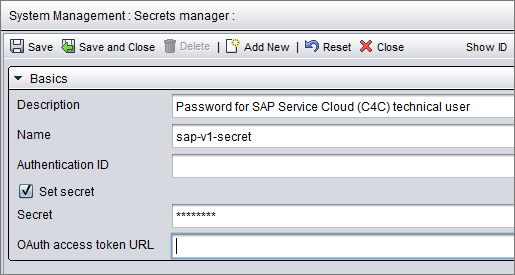
Click Add New and enter the details for your C4C technical user:
-
Description: Describe what this secret is used for.
-
Name: We recommend using the same name (sap-v1-secret) as in this example so you'll be able to use the example JSON below without editing this part. If you define a different name for the secret, you'll just need to change the name in your JSON configuration.
-
Secret: Enter the password of your C4C technical user.
-
- Save your changes.
Add an event-driven integration in System Configurator
To configure chat attachment upload in System Configurator, go to .
Add an integration with the following details:
-
Channel Type: Chat
-
Endpoint URL:
Use the URL for your region:
- Europe: https://cc-workflows-eu-c1.cc.sinch.com/prod/chat-attachments
- North America: https://cc-workflows-na-w2.cc.sinch.com/prod/chat-attachments
- Australia: https://cc-workflows-au-s2.cc.sinch.com/prod/chat-attachments
- Conversation Direction:
-
For incoming chats, you can create several configurations with direction Inbound and select relevant queues in the Queues block.
-
For outgoing chats, you can create several configurations with direction Outbound and select a queue of type @sinchsms.com or @<subchannel>.sinchconversation.com in the Queues block.
-
If you want to use the same configuration for both inbound and outbound chats, select Both.
Direct chats don't support attachments.
-
-
Ordinal: Enter an order number for this integration. For more information about this field, see the Event-driven integrations document.
-
Event: Ended or Closed
-
JSON for Configuration: This is the format of the JSON definition. For more details on which parts of this you'll need to edit, see below.
{
  "request": {
    "method": "POST",
    "authentication": {
      "type": "oauth",
      "secrets_ref": "orchestration-layer"
    },
    "headers": {
      "x-cmi-api-key": "{secrets.ri-apikey}",
      "x-cmi-password": "{secrets.cmi-chat-attachment-upload-user}",
      "x-sap-v1-password": "{secrets.sap-v1-secret}"
    },
    "body": {
      "cmi_url": "https://8h6b51di7x.execute-api.eu-central-1.amazonaws.com/acme/cmi",
      "cmi_user": "chat.user",
      "sap_v1": {
        "url": "https://my2554607.de1.crm.cloud.sap",
        "user": "v1user"
      },
      "contact_id": "{contact.guid}"
    }
  }
}
Accessing Contact Management Interface (CMI)
You'll need to access CMI to upload chat attachments.
Edit the following parameters:
-
In the JSON request header x-sap-v1-password: Replace sap-v1-secret with the name of the secret added for accessing your SAP Service Cloud (C4C) environment.
-
In the JSON request body:
-
cmi_url: Replace the URL (https://8h6b51di7x.execute-api.eu-central-1.amazonaws.com/acme/cmi) with the public address of your Contact Management Interface (CMI)
-
cmi_user: Replace the user (chat.user) with the logon name of your CMI user that has the settings and rights listed at Before you start.
-
url: Replace https://my2554607.de1.crm.cloud.sap with the URL of your SAP Service Cloud (C4C) environment.
-
user: Replace v1user with the user ID of the technical user you defined in your SAP Service Cloud (C4C)'s communication arrangements.
-
If you didn't use the same names for your secrets as in our example, edit the name in the JSON header:
-
x-cmi-api-key: Replace ri-apikey with the name of the secret added for your CMI's API key in Secrets manager
-
x-cmi-password: Replace cmi-chat-attachment-upload-user with the name of the secret added for your CMI's password in Secrets manager
Keep these parts as they are in the example JSON
-
Reference to secret orchestration-layer in the authentication: the secret to access the orchestration layer.
-
Parameter contact_id : to identify the conversation for the attachment upload.