Configuring an event-driven integration
Follow this procedure to configure integrations using the event-driven integrations framework.
- In System Configurator, go to .
- Click Add New.
-
In the popup that opens, select the channel type of the integration:
-
Phone
-
Chat
-
Email: only supported for inbound conversations
This includes support for tasks and action items.
-
Multi-Channel: use only if you want to use the integration for several channels
-
- Enter a name and description for the integration.
- In the Endpoint URL field, enter the URL for the
connection to the web service. Currently, the only supported protocols are HTTPS
and EDI (see more below). You can use runtime data placeholders which will be
replaced dynamically at runtime using the data available from the triggering event. For example:
- In https://external.rest.api/contact-pro-events/{event}, {event} will be replaced with the name of the event type.
- In https://external.rest.api/contact-pro-contacts/{contact.id}, {contact.id} will be replaced with the unique identifier of the contact.
To run a set operation based on a condition on data that has already been fetched with a previous integration, enter edi://echo as the endpoint URL. Read more about using echo in Fetch customer data and use it on set operations based on a condition.
Note:You can define query parameters in the request part of JSON configuration. - In the Ordinal field, enter an order number for this
integration. The integrations will be triggered in this order if there are
several integrations for the same conversations. This means the combination of
queue(s), direct calls and/or chats, and events. The maximum number of triggered
integrations is three, excluding integrations with endpoint URL
edi://echo. If the same operation is triggered in
several integrations:
- The data in the save object is cumulated. Overlapping data is overwritten.
- A set operation is only run in the first integration that executes it successfully.
- In the Conversation Direction field, select the direction
of conversations where you want this integration to be used:
- Inbound
- Outbound
- Both
-
From the Conversation events that trigger this integration checkboxes, select when you'd like this integration to be triggered.
Table 1. Conversation events supported for each conversation type Event Description Chats in Chats out Calls in Calls out Emails Campaign calls Received The conversation has been received in Sinch Contact Pro but it hasn't been registered yet to an allocation queue. 

Queued The conversation has been registered to an allocation queue. Allocated The conversation has been allocated to an agent. Accepted The conversation has been accepted by an agent (inbound) or connected to an external party (outbound) Rejected The conversation has been rejected by an agent or its allocation cancelled by the system (inbound), or the call has been rejected by the external party (outbound) Transferred The conversation has been transferred to a queue or to another agent by an agent. Forwarded The conversation has been forwarded (overflowed) from one queue to another. Ended The conversation has ended after being connected to an agent (inbound) or an external party (outbound) Abandoned The conversation has ended without being connected to an agent (inbound) or an external party (outbound) Closed The conversation wrap-up has ended
Note that for closed conversations source, destination, and queue address are empty. Read more about available data.
Recorded The call recording is ready and has been stored.
Note that for recorded conversations source, destination, and queue address are empty. Read more about available data.
-
Define in which conversations the integration is used:
-
In the Direct Conversations block, select if the integration is used in direct calls and direct chats. You can use the same integration in both direct and queue conversations.
-
In the Queues block, add the queues where the integration is used:
-
For chats, define the queue(s) from which messages are sent or to which they arrive. Define this for both inbound and outbound chats.
-
For calls, define the queue(s) for inbound queue calls.
-
-
-
If you've defined the credentials or access keys you'll use with the web service in Secrets manager, you can leave the Authentication block empty and go to the next step. If you haven't defined secrets in Secrets manager, define them in the Authentication block.
Table 2. Authentication options Type Authentication ID Secret Basic basic:<username> Password Digest digest:<username> Password OAuth oauth:<client_id> Note:You must also define client_id in the authentication object in the JSON for Configuration field.Client secret Header value (for example, API key) Chosen name Secret To authenticate the integration to access the web service, you can refer to the authentication data you've defined in one of the following ways in your JSON:
- authentication type: When using basic authentication, use "authentication": {"type": "basic"}, .
- runtime data placeholder: refer to the secret part of your authentication details by specifying the request.headers property value as {"x-api-key": "{authentications.api-key}"}. In this example, authentication ID is "api-key". This resolves into the secret defined for the authentication.
Note:If you refer to credentials in your JSON configuration but they haven't been defined in the Authentication block or Secrets manager, the request will fail before sending data to the server. -
In the JSON for Configuration field, define the JSON request for your integration. If you are adding an integration that also needs to return a response, define it here as well. The structure of the request and response is:
{ "request": { "authentication": [object], "method": [string], "headers": [object], "params": [object], "body": [object], }, "response": { "set": [object], "save": [object], "save-ai": [string or object] } }Tip:To undo your edit, use the Ctrl + Z (Windows) or Command + Z (Mac) keyboard shortcut. To redo, use Ctrl + Y (Windows) or Command + Shift + Z (Mac).Referring to secrets stored in Secrets manager
To insert the name of a secret defined in Secrets manager into your authentication object:
-
Place your cursor where you want to insert the name:
Click Add secret. The Select secret dialog window opens.
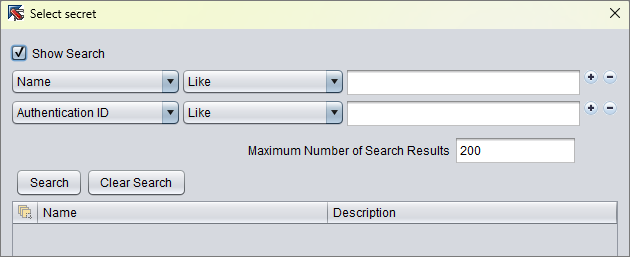
-
Find and select the secret and click Add.
-
- Save the integration.
For more details, see how to build the request and how to build the response.
Limitations in using the Closed event
Only the following contact data is available in the Closed event:
{
   "channel_type": "chat",
   "direction": "inbound",
   "id": "D266BF0A7A5E11EFAC990281A3237849",
   "guid": "D266BF0A7A5E11EFAC990281A3237849",
   "created": "2024-09-24T10:23:11.711Z",
   "priority": 0,
   "queue": {
      "id": "842D193FA516435396E766747330A74B"
   },
   "agent": {
      "id": "26364A4DFA9F413AA5A5F99F96F38B8E",
      "number": "795",
      "chat_address": "someone@chat.corp"
   }
}
Properties with null values have been removed from the above example for display purposes.
Note the following:
-
For direct contacts, the value of the queue property is always null.
-
The value of the created property is the UTC date/time of wrap-up start, not contact creation.
The same applies to the value returned by the contact.get_seconds_since_created() conditional expression.
-
Previously fetched or saved CAD is no longer available for use in the Closed event.
Copying an integration
To create a new integration by copying an existing one, click Copy.
Disabling an integration
To disable an integration, deselect all events.
Examples of integrations
Fetch data from an external system and show it to the agent
Listen to conversation lifecycle events
Control the routing of conversations
Send a customer a satisfaction (CSAT) survey
Fetch customer data and use it on set operations based on a condition
Analyzing an email with ChatGPT and saving the analysis