Configuring System E-Mail Settings
You must have rights to modify the platform (blocks Basic Settings, Attachment Settings, and Error Texts), to manage incoming e-mail servers (the block Incoming E-Mail Server), or to manage outgoing e-mail servers (the block External Outgoing E-Mail Server).
You use this procedure to configure the system-wide e-mail settings.
For channel-level settings in , see Configuring Channel Settings, and for queue-specific settings in , see Configuring E-Mail Settings.
The certificate for encrypting e-mail passwords has been made mandatory in 1608. The certificate is defined in the Infrastructure Administrator (IA) application in Agent Server variables but you can view it in . In earlier versions, if no certificate was defined, passwords were communicated as plain text.
- On the System Configurator main screen, choose .
-
Choose Basic Settings and configure the settings according to the following table.
Field
Description
Encoding Method for Attachments According to File Type
Enter the transfer encoding for attachments by file type.
When an attachment is added to an e-mail, the default encoding type is used unless you specify the attachment file type to be encoded with some other method. The setting consists of file type and encoding method pairs. The values are separated with an equal sign (=) and the pairs are separated with a semicolon (;). An asterisk (*) is a wild card character that can be used to change the default encoding.
For example, value
wav=base64;txt=7bit;*=8bit;
defines that wav files are encoded with the base64 encoding, text files with 7bit and all other files with 8bit. The default value is base64.Character Set for E-Mail Message Body
Enter the character set for e-mail body. The selectable values are defined by the MIME standard. The default value is utf-8.
Encoding Method for Sent E-Mails
Enter the transfer encoding method for sent e-mails. The selectable values are defined by the MIME standard. The default value is 8 bit.
Max. Size of Incoming E-Mail (KB)
Enter the maximum mail size that is read via the IMAP connection for incoming mails. In practice the accepted mail size may be smaller than this since binary attachments are encoded. If a mail is too large, the body text and attachments are not read from the mail server.
The maximum value is 100 000 KB and the default value is 25000 KB.
The maximum size of the sent e-mail is 100 MB, and the maximum size of one attachment is 10 MB, these values cannot be adjusted.
-
In the Attachment Settings assignment block, define where e-mail attachments are saved.
As of the version SP07, e-mail attachments can be saved into a disk instead of the database. If you do not define these settings, the attachments are saved into the database.
To move your current attachments from the database to a disk, you must run DbTools.exe. For more information, see Upgrade Guide.
Note:If you change the settings Save E-Mail Attachments in Folder, Attachment Folder, and Minimum File Size (Bytes) after they have been defined and saved, you must restart the Agent Server (AS) component.
Field
Description
Save E-Mail Attachments in Folder
Select this option if you want to save e-mail attachments into a disk instead of the database.
Enter the location in the Attachment Folder field. Otherwise the attachments are saved into the database.
Attachment Folder
Enter the file location using the UNC name format or browse to the correct folder.
The structure of the created subfolders in the location is YYYY\MM\DD.
Minimum File Size (Bytes)
Enter the minimum size of the created file. The default value is 8000.
If the attachment size is less than 8000, the attachment is saved into the database.
Save Email in MIME Format
When this option is selected, emails through the OII integration are saved in the MIME format. By default, this setting is enabled.
Added in 2005.
-
Configure the error text according to the following table.
Field
Description
E-Mail Too Large
Enter the replacement text if the received mail is too large. The maximum size is the value defined in Max. E-Mail Size (KB). The default value is
*** ERROR: Mail was too big, body and attachments dropped ***
.E-Mail with No Body Text
Enter the replacement text if the received mail has no body text at all, or if an unusual error occurs when receiving the body text part. The default value is
***WARNING: Could not get IMAP body text
. -
Configure Incoming Mail Servers (until SP09 E-Mail Servers) according to the following table.
Field
Description
Name
Enter the name for the incoming e-mail server. There are no restrictions regarding the name. The names are displayed when you choose the server for an e-mail queue during queue configuration.
Address
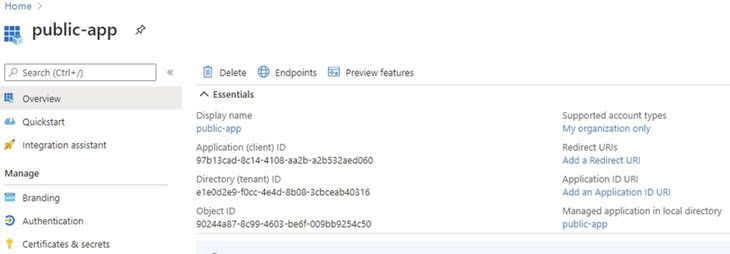
Enter the login address with the tenant ID.
The address is of format https://[login address]/[tenant ID, which is a GUID, copied from Azure AD portal]. For example:
https://login.microsoftonline.com/[tenant ID]
You get the tenant ID from the Overview page of Microsoft Azure Active Directory.
Authentication Type
Choose whether the authentication is for a user (OAuth User) or a server (OAuth Service).
Client ID
Enter the Application (client) ID value from Microsoft Azure Active Directory

Secret
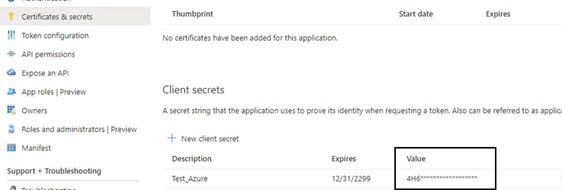
This is needed for the OAuth Service. Otherwise, anyone can access it. The secret is not needed for OAuth User because password is required for the queue number. There is no password in OAuth Service for the queue number and application registration should be protected at application registration level with the secret. Enter the mail server secret from the Value column in Microsoft Azure Active Directory.

-
Configure External Outgoing Mail Server according to the following
table.
Field
Description
Enable External Outgoing Mail Server
Enable using an external server for outgoing mail.
Before 1608, the only option was that SMTP Virtual Server under IIS was installed to server where Email Sender package was installed, and it was used for sending e-mails. As of 1608, it is possible to connect with an external SMTP server managing the outgoing mail.
-
If the option is selected (external server is enabled), fill out the other settings in this block to configure the mail server.
-
If this option is not selected, the legacy method is used, and IIS must be included in the EMailSender installation.
IP Address or Name of Mail Server
Enter the IP address or name of the external outgoing e-mail server.
Port
Enter the TCP/IP port number.
Use Secure Connection (SSL)
Secure the connection to the server with Secure Socket Layer (SSL).
Authentication Type
Choose the option:
-
Basic Authentication: Authenticate the server user with password.
-
Anonymous Access: The user can access the server without authentication.
-
OAuth Service: Authenticate the server user with OAuth.
Server User
Enter the user name for the server when Basic Authentication is used. Note that this is not an Sinch Contact Center user account.
Set Password
When Basic Authentication is used, and you want to define the password here, choose this option.
Password
Define the password for the server when Basic Authentication is used.
Note: The encryption certificate (Agent Server variable Certificate for External Password Encryption) is used for decryption even if that certificate has expired. If the expired certificate is removed from the system, encryption/decryption will fail. To avoid that, do not remove the expired certificate from the server. If the certificate has been removed, to correct the situation re-enter this password, and the one for SMS Server in . -
- Save your entries.
