Configuring E911 in System Configurator
To configure these settings, you need the Emergency Admin role. For creating a switching route, you need rights to modify platform.
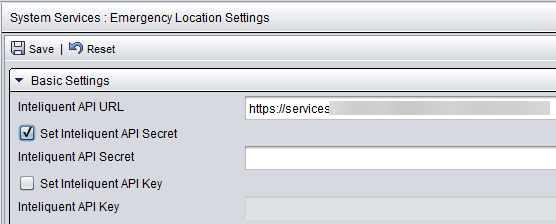
System Services
- On the System Configurator main screen, choose .
- Configure the settings according to the following table.
Field Description Inteliquent API URL Enter the URL of your Inteliquent Services API. Set Inteliquent API Secret To enter the API secret, select this option. Inteliquent API Secret Enter the API secret located in . Set Inteliquent API Key To enter the API key, select this option. Inteliquent API Key Enter the API key located in . Emergency Numbers Enter a comma-separated list of emergency numbers. A call to any of these numbers triggers the emergency location delivery and notifications are sent. Send Email Notification To enable sending of an email notification to defined email addresses, select this option. The notification text informs recipients that an emergency call has been made, who made the call and when it was made. The content of the notification is pre-defined and cannot be modified. Email Notification Addresses Enter a comma-separated list of email addresses to which the notification is sent. Email Queue for Sending Notifications Choose the queue from which the email notification is sent. - Save your entries.Note: When you save the configuration, information related to API secret and key settings is no longer displayed on the user interface: the checkboxes and fields are grayed out. If you need to change API secret or key, select the respective checkbox first.
Switching Route
To configure emergency calls to go out from the Inteliquent trunk, configure a switching route.
- On the System Configurator main screen, choose and click Add New.
- In the Basics block, enter a name for the route and a description.
- In the Paterns block, enter the following
information:
Field Description Name Enter a name for the emergency call pattern. Description Enter a free-form description. This field is optional. Pattern Enter the emergency number. - In the Destinations block, choose the trunk that is used as destination. Define trunks first in the Trunks view.
- Save the switching route.
For more information about switching routes, see the Call Switching section in the System Configurator (SC) document.
User Settings Template
Agents need the emergency feature enabled.
- Choose and search for the template for which you want to enable the
emergency location feature.
The search result list appears.
- Choose the template by double-clicking it.
- Choose Communication Panel Settings.
- Select the option Enable Emergency Feature.
- Save the template.