Schedules
In this procedure we show you how to define opening hours for your service.
Prerequisites
-
Calendar created if the default calendar isn't used
-
Rights to:
-
Create schedules
-
View queues
-
View calendars
-
View the contact center
-
View prompts
-
View prompt files if you want to listen to the audio prompts
-
Define service times for a queue
You want to define the times a queue is open.
-
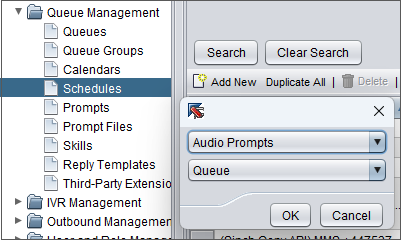
On the System Configurator main screen, choose .
-
Click Add New.
-
Choose Service Times and then either Contact Center or Queue.
-
In the Queue block, choose Add to add the queues to which this schedule applies.
-
In the Calendar block, do the following:
-
Choose Add to select the calendar that is used with the schedule.
-
Search for the calendar, click on it, and choose Add.

You can choose several calendars, and they are applied according to their priority level.
-
-
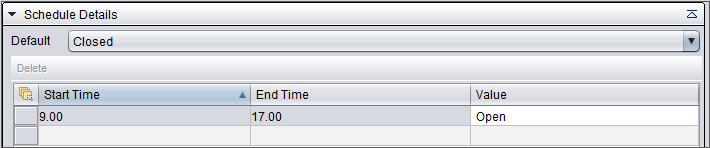
In the Schedule Details block, do the following:
-
Choose Closed as the default function.
-
Define when the service is open in the exception table by entering the service times and then choose Open.
-
-
Save the schedule.
Service times for the contact center
When you create service time for the contact center, follow the procedure described above. However, you can't add a contact center so the Contact Center block will be empty. Since the system contains only one contact center, although it's not shown in the block, the schedule is automatically applied to it.
Create an ad hoc schedule
You want to create a temporary schedule to inform your customers that a phone queue is closed between 9 AM and 11 AM. You also want the system to play a custom prompt instead of the Service closed prompt. Create the prompt according to instructions in Prompt management.
Any overlapping ad hoc schedules must be deleted before you can save the new ad hoc schedule. When a dialog window appears asking whether you want to delete the overlapping schedules, choose Yes. Otherwise the new schedule won't be saved.
-
On the System Configurator main screen, choose .
-
Click Add New.
-
Choose Service Times and then either Contact Center or Queue.
-
In the Queue block, choose Add to add the queues to which this schedule applies.
-
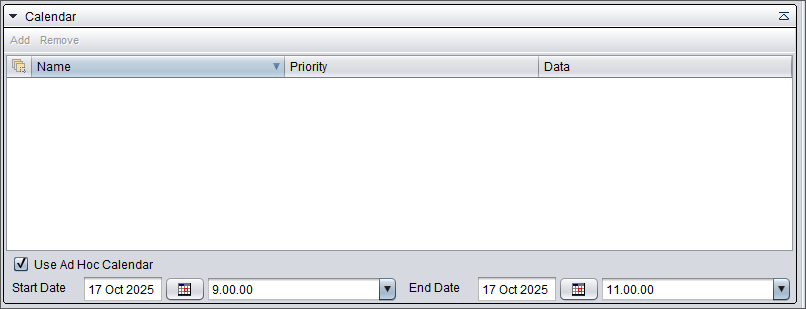
In the Calendar block, select Use Ad Hoc Calendar and enter the start and end times when the ad hoc calendar is applicable.
-
In the Schedule Details assignment block, choose the default function of the ad hoc schedule.
If you need to add exceptions to the ad hoc schedule, define the times in this block.
-
To add the custom prompt, do the following:
-
In click Add New and then the prompt type and Queue.
-
In the Queue block, choose Add to add the queues to which the prompt of the ad hoc schedule applies.
-
In the Calendar block, select Use Ad Hoc Calendar.
-
Enter the start and end times when the ad hoc calendar is applicable.
-
In the Schedule Details assignment block, choose the prompt type and the actual prompt that is played.

-
-
Save the ad hoc schedule.