Using IVR Editor
Use
IVR Editor enables creating and editing IVR applications. Notice the following
In the IVR Editor:
-
When you choose the IVR start level
 on the left side, the right side displays the VoiceXML document text. You cannot edit the text directly there, but you can edit your application in a text editor, and import the file. Non-supported elements are removed during import.
 -
When mandatory attributes have missing or invalid values, a red
 icon is displayed, and with smaller errors, a yellow
  one. Make sure that there are no error icons displayed before you activate an IVR.
 -
Adding an element adds one XML element as the last row in the document. The call moves from the first element to the next one, and so on, except that in some elements you can define conditional jumps, or you can define a goto element that defines the next element.
-
Some elements can be placed directly to the
 , and some can be placed only in parent elements as child elements. Certain parent elements can have only certain child elements; for example to add a transfer element, you must first add a form element. Parent and child elements are listed in Supported VoiceXML Elements.
Prerequisites
You must have rights to edit custom IVRs.
-
Plan the flow of your IVR carefully before starting the editor.
-
Understanding VoiceXML principles is an asset.
-
Element attribute expressions use Python programming language syntax.
Procedure
To open the editor, on the System Configurator main screen, choose , and either click Add New first on application level and then on version level, or search and double-click one of the existing applications, and then double-click one of its versions.

-
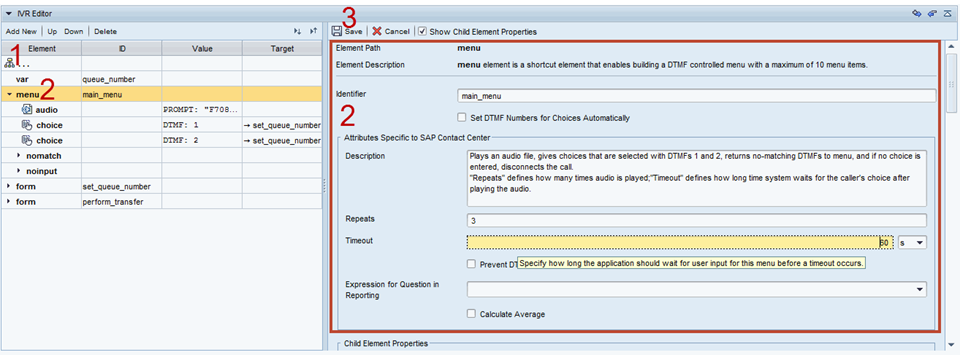
To create the first step of an IVR, right-click the icon
 and choose Add New and one of the following options:
-
Child Element: Adds a single element. See the list of Supported VoiceXML elements.
-
Child Element Block: Elements required for frequently used functions are combined in element blocks. Adding an element block adds several rows to the document, and you just need to define attributes for all child elements. See the list of predefined blocks and their elements.
-
-
To edit element attributes, choose the element on the list on the left, and edit corresponding attributes on the right. To display a tooltip, place the cursor on the attribute field.
To edit all attributes of a block at a time, select the main level of that block, and select the Show Child Element Properties checkbox. Note that this selection displays two generations only. If there are child elements with child elements, their attributes are not displayed before you choose the actual element.
-
To save the attribute definitions, click Save in the upper left corner of the attribute field. After that, ID, Value and Target attribute values are seen adjacent to the element on the left. Make sure that no error icon is displayed.
-
To add more elements, either add a child element or a child element block to the main
 level or a parent element, or add a new element after current element by selecting Add New Sibling.
 -
To copy and paste elements, right-click the element on the left, and choose Copy. Then right-click an appropriate parent element, and choose Paste. Alternatively you can copy-paste elements to and from a text editor. See Copying IVR Applications for more information.
-
To change the order of elements, right-click the element and choose Move Up or Move Down, or choose the element, and click the Up or Down button. You can move an element within the level it belongs to, only.
-
To remove an element, right-click it and choose Delete, or choose the element, and click the Delete button. You can delete any child element, also one that is part of a predefined block.
Note:The tool does not take care if the function remains logically sound after deleting an element.
