Configuring OAuth Authentication for Microsoft 365
Using OAuth when authenticating requests when fetching emails from Microsoft 365
Prerequisites
- Microsoft Azure Active Directory account configured. For instructions, see separate
documents. If you register your Azure application:
- • For user, see the MS365 Mail Server (OAuth User) document. In System Configurator (SC) configuration, choose OAuth User as the authentication type.
- • For server, see MS365 Mail Server (OAuth Server) document.. In SC configuration, choose OAuth Service as the authentication type.
- Python installed according to the instructions below.
OAuth uses HTTPS as transport protocol. It requires cryptography software to verify server certificates. Cryptography software is subject to export restrictions and cannot be included and distributed alongside CEM distribution. You need to download the required Python software package and make it available to Sinch Contact Pro installation procedure.
- Open Windows PowerShell.
- Change the directory using cd and navigate to the Python for CEM directory, which should be under the (../install/7.0.xx.x/) directory.
- To download the required python files, type .\get-py.ps1. This
will:
- Download the Python files and libraries from the web (ensure Internet access is possible) and
- Create content and external folders in your file system.
The destination depends on arguments passed to the script. If no argument is passed, it will go to the subfolder contents\Python\external of the folder where the get-py.ps1 script is located. During run, the script prints the Python distribution location in the console window: Generating python at location: xxx
Note: If downloading fails with the get-py.ps1 script, it's most likely is a certificate issue. The script downloads from https://www.python.org and https://files.pythonhosted.org. Both certificates are issued by CA which are not trusted by the AWS EC2 instances. You can check this by copying and pasting the URLs into your browser's address bar. The browser will show either a warning or secure connection. If there's a warning, you need to install CA root to trusted root and run the script again. For information about installing certificates, see Certificates in the Installation Guide. - Go to Infrastructure Administrator (IA).
- Right-click on HAC Nodes and then choose Refresh all hosts.
- Create as many (empty) virtual units as you have CEM instances in your system, for example ExternalPython1 and ExternalPython2.
- Add software and instance for each External Python VU that you created and apply changes.
- Verify that Python distribution was copied to VU folder (<VU_Python>\Python\External).
- Purge unused variables on software for each core (where CEMs are located) on instances (not VUs).
- Now continue with the normal upgrade procedure as instructed in the Installation Guide.
- Enter the value of the variable External Python Directory under on all CEM virtual units. Use a naming convention that clearly links ExternalPython and Core virtual units, for example ExternalPython1 – Core1, ExternalPython2 – Core2, and so on.
- Right-click Virtual Units in the tree and choose Synchronize Instances. This advances new changes to all HAC nodes where the changed software package has instances.
- To commit the changes, choose either (or Apply Changes to Local System) per every HAC node, or right-click the HAC Nodes in the model tree and choose Apply All Changes To All Hosts.
- Activate virtual units.
- Save the system model. Note: Make sure that all instances of the upgraded VUs are in status Active or Spare before saving.
- Set IA to Monitoring Mode to propagate the new model to all nodes.
Incoming Servers
If you want to use OAuth authentication for the incoming email server, configure it in according to the table below:

|
Field |
Description |
|---|---|
|
Name |
Enter the name for the incoming e-mail server. There are no restrictions regarding the name. The names are displayed when you choose the server for an e-mail queue during queue configuration. |
|
Address |
Enter the login address with the tenant ID. The address is of format https://[login address]/[tenant ID, which is a GUID, copied from Azure AD portal]. For example: https://login.microsoftonline.com/[tenant ID] You get the tenant ID from the Overview page of Microsoft Azure Active Directory. |
|
Authentication Type |
Choose whether the authentication is for a user (OAuth User) or a server (OAuth Service). |
|
Client ID | Enter the Application (client) ID value from Microsoft Azure Active Directory 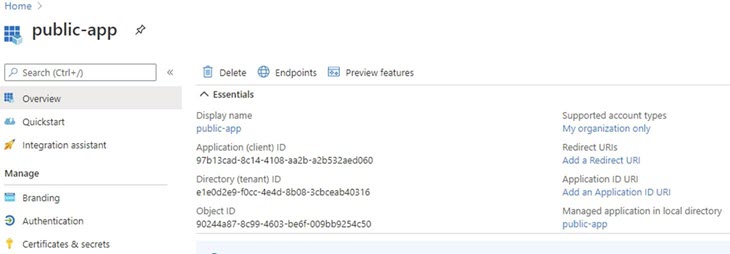 |
|
Secret | This is needed for the OAuth Service.
Otherwise, anyone can access it. The secret is not needed for OAuth
User because password is required for the queue number. There is no
password in OAuth Service for the queue number and application
registration should be protected at application registration level with the secret. Enter the mail server secret from the Value column in Microsoft Azure Active Directory. 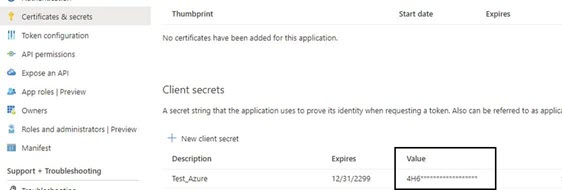
|
Outgoing Servers
If you want to use OAuth authentication for the outgoing email server, configure it in according to the table below.
| Field | Description |
|---|---|
| Enable External Outgoing Mail Server | To use an external server, select this option. |
| IP Address or Name of Mail Server | Enter the tenant ID of your Office365 system. This is a GUID or a domain name. |
| Authentication Type | To use OAuth authentication, choose the option OAuth Service. |
| Server User | Enter the GUID of the user using the mailbox. |
| Set Password | To enter the password of the mailbox user, select this option. |
| Password | Enter the password. |
Queue Configuration
Go to and create an email queue as instructed in Creating Queues in Contact Center 365. In the Numbers/Addresses block, enter the following:
| Field | Function |
|---|---|
| Address |
Enter the full email address you defined in https://admin.microsoft.com/Adminportal/Home#/homepage during mailbox configuration. For OAuth user, it is the user email address. For OAuth server, it is the email address of the shared mailbox. |
| Priority Optional |
Enter a value that defines how quickly the contact should be answered in regard to other contacts (the lowest value has the highest priority). For example, queue A has the priority value 5 and queue B has the value 10. The calls from queue A are allocated first. For more information, see Priority. This value overrides the value in the Priority field in the Contact Management block. |
| Extension Language Optional |
Choose a language if it differs from the system default value, or if you want to offer service in various languages. If you have chosen a queue language (in ), the extension language value overrides the language value of the queue. |
| E-Mail Account | Enter the account name that is used when the mailbox folder is read. |
| E-Mail Password | This is required for OAuth user. Enter the password that is used when the mailbox folder is read. |
| Sender Optional | Select this option if you want that the e-mail account can be used as a sender. |
| E-Mail Server |
Enter the incoming mail server name and IP address by choosing the edit icon and by searching for the correct server. Incoming mail servers are defined in . |
For other queue-related settings, see the corresponding sections in Creating Queues.