Setting up email
If you are using OAuth for authenticating the requests when fetching emails from Microsoft 365, see Configuring Microsoft 365 in Sinch Contact Pro.
To use Google Mail (Gmail), define the Google email service to use less secure app mode for the email box. Less secure here means that the user ID and password authentication is used. For information about how to change the app mode, see Google documentation.
-
Configure incoming mails servers (IMAP) in .
You can configure multiple servers.Field
Description
Name
Enter the name for the incoming e-mail server. There are no restrictions regarding the name. The names are displayed when you choose the server for an e-mail queue during queue configuration.
Address
Enter the login address with the tenant ID.
The address is of format https://[login address]/[tenant ID, which is a GUID, copied from Azure AD portal]. For example:
https://login.microsoftonline.com/[tenant ID]
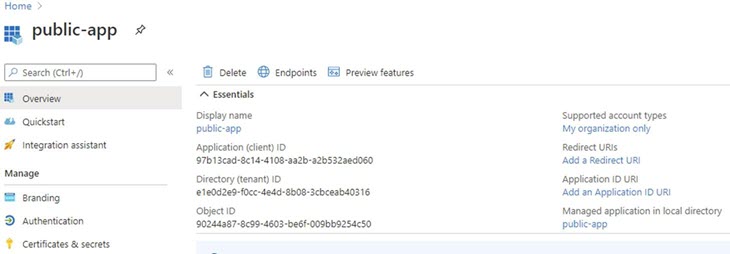
You get the tenant ID from the Overview page of Microsoft Azure Active Directory.
Authentication Type
Choose whether the authentication is for a user (OAuth User) or a server (OAuth Service).
Client ID
Enter the Application (client) ID value from Microsoft Azure Active Directory
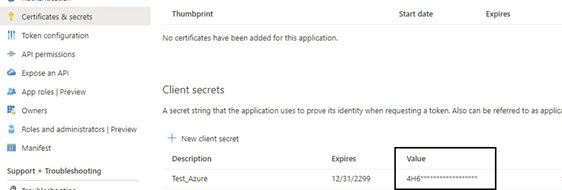
Secret
This is needed for the OAuth Service. Otherwise, anyone can access it. The secret is not needed for OAuth User because password is required for the queue number. There is no password in OAuth Service for the queue number and application registration should be protected at application registration level with the secret. Enter the mail server secret from the Value column in Microsoft Azure Active Directory.
-
Create email queues in .
For detailed instructions, see the System Configurator document ( ).To set up an email queue you need to enter basic information for queues, define queue addresses and incoming email server used, configure email settings and give users access rights to the queue.
Queue Type
Field
Function
Phone, e-mail, and chat
Address
Enter the phone number or address.
Use the Number Viewer tool to check which phone numbers are available and unused in the queue number range.
Note:Make sure you don't use any national emergency number as an IVR, a user, or a queue number.For chat and e-mail queues, you can enter the actual address (for example
helpdesk@company.com
)Note:Do not use underscore (_) in the queue address. You can use other special characters.You can enter as many phone numbers or addresses as you need. This is convenient if you want to offer service in various languages, or if you want to define different skill sets.
Email
Display Name To show a display name in addition to the email address to a email recipient, enter the name here.

Agents in Communication Panel see this address and can select it as a sender.

The recipient sees the defined display name as part of the sender address.

Phone, e-mail, and chat
Priority
Enter a value that defines how quickly the contact should be answered in regards to other contacts (the lowest value has the highest priority). Note that empty field and value 0 are interpreted as 1.
For more information and examples, see Priority.
Note:This value overrides the value in the Priority field in the Contact Management block.
Phone, e-mail, and chat
Extension Language
Choose the language for the extension. Choose a language if it differs from the system default value, or if you want to offer service in various languages.
Note:If you have chosen a queue language (in ), the extension language value overrides the language value of the queue.
Phone and chat
Skills
Enter the skill for the queue by clicking the edit icon. A dialog box opens and you can choose the skill requirements.
Chat Country Code Enter a proposed country code prefix for the queue. Communication Panel proposes this prefix to the user when creating an SMS or WhatsApp message. Enter the country code in the format +123.
E-mail
E-Mail Account
Enter the account name that CEM uses when it reads the IMAP folder.
E-mail
E-Mail Password
Enter the password that CEM uses when it reads the IMAP folder.
E-mail
Sender
Select this option if you want that the e-mail account can be used as a sender.
E-mail
E-Mail Server
Enter the incoming mail server name and IP address by choosing the edit icon and by searching for the correct server.
Incoming mail servers are defined in .
Chat
SMS Sender ID
Enter the number in E.164 format, which is:
+ [country code][area code and number]
for example +12311234567
Note:For outgoing emails you can specify only one server.
If basic authentication is used, then for each outgoing email connection to SMTP server is set up using the specified credentials and it is checked if the used sender address is allowed or not. Allowed sender addresses must be configured in the SMTP server by the customer.
-
Configure outgoing email server (SMTP):
Field
Description
Enable External Outgoing Mail Server
To enable the use of an external server for outgoing mail, select this option.
IP Address or Name of Mail Server
Enter the IP address or name of the external outgoing e-mail server.
Port
Enter the TCP/IP port number.
Use Secure Connection (SSL)
Secure the connection to the server with Secure Socket Layer (SSL).
Authentication Type
Choose the option:
-
Basic Authentication: Authenticate the server user with password.
-
Anonymous Access: The user can access the server without authentication.
-
OAuth Service: Authenticate the Microsoft 365 email server user with OAuth.
Server User
Enter the user name for the server when Basic Authentication is used. Note that this is not a Sinch Contact Pro user account.
Set Password
When Basic Authentication is used, and you want to define the password here, choose this option.
Password
Define the password for the server when Basic Authentication is used.
Note:The encryption certificate (Agent Server variable Certificate for External Password Encryption) is used for decryption even if that certificate has expired. If the expired certificate is removed from the system, encryption/decryption will fail. To avoid that, do not remove the expired certificate from the server. If the certificate has been removed, to correct the situation re-enter this password, and the one for the SMS Server in .Max. Email Size (MB) Enter the maximum size of an email. The setting has no default value so you define it according to the restrictions of your email server. Max. Number of Recipients Enter the maximum number of recipients. This includes the recipients in the To, Cc, and Bcc fields. The setting has no default value so you define it according to the restrictions of your email server. Max. Attachment File Size (MB) Enter the maximum size of an email attachment. The setting has no default value so you define it according to the restrictions of your email server. -