Configuring Security Settings in BO
Folders, universes, connections, and user groups are created in the previous step.
Configure the following security settings in BusinessObjects Central Management Console (CMC) to grant the necessary rights to your tenant.
The examples use Sinch as the tenant name.
Folders
To add rights for the tenant's user group to view the tenant's reports:
- In CMC, select Folders either from the dropdown on the top left or from the icon list on the left.
In the Folders view, right-click on the Sinch CCtr Standard Reports folder and select User Security:
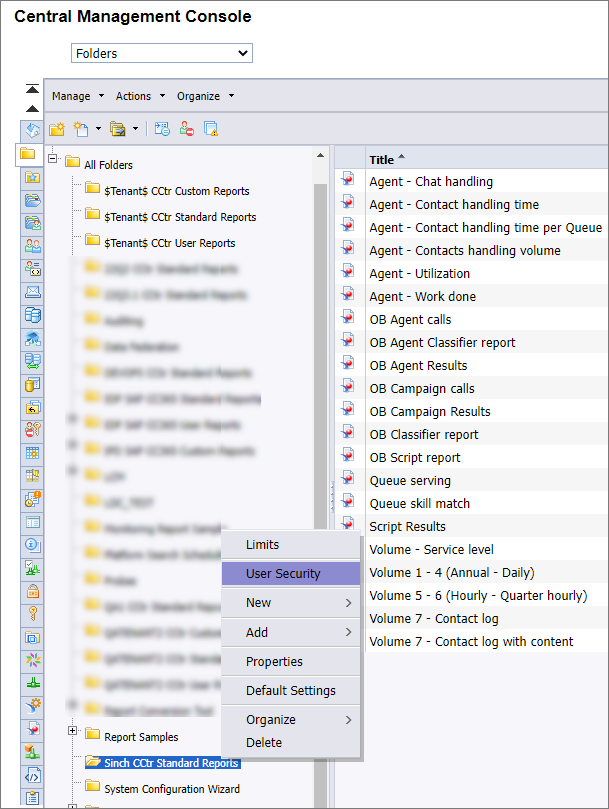
The User Security view opens. Note: The same folder name is used for both reporting and monitoring.
- In the User Security view, click the Add Principals button. The Add Pricipals view opens.
- From the left-side menu, select Group List and, in the list that opens, select Sinch SAP CC365 Reporting Users (multi-tenant installation package) or Sinch CCtr Reporting Users (single tenant installation package).
- Click the right arrow to add Sinch SAP CC365 Reporting Users or
Sinch CCtr Reporting Users to the Selected Users or
Groups list.

- Click the Add and Assign Security button. The Assign Security view opens.
- Select SAP CCtr View Reports (multi-tenant package) or Sinch CCtr View Reports (single tenant package) and click the right arrow to add it to the Assigned Access Levels list.
- Click OK. You are returned to the User Security view.
- Check that Sinch SAP CC365 Reporting Users or Sinch CCtr Reporting Users now has the SAP CCtr View Reports right in the Access column and click Close.
Universes
To add rights for the tenant's user group to access reporting data:
- In CMC, select Universes either from the dropdown on the top left or from the icon list on the left.
- In the Universes view, right-click on Sinch SAP CC365 Universes (multi-tenant package) or Sinch CCtr Universes (single tenant package) and select User Security. The User Security view opens.
- In the User Security view, click the Add Principals button. The Add Pricipals view opens.
- From the left-side menu, select Group List and, in the list that opens, select Sinch SAP CC365 Reporting Users (multi-tenant package) or Sinch CCtr Reporting Users (single tenant package).
-
Click the right arrow to add Sinch SAP CC365 Reporting Users or Sinch CCtr Reporting Users to the Selected Users or Groups list.
- Click the Add and Assign Security button. The Assign Security view opens.
- Select SAP CCtr Data Access (multi-tenant package) or Sinch CCtr Data Access (single tenant package) and click the right arrow to add it to the Assigned Access Levels list.
- Click OK. You are returned to the User Security view.
- Check that Sinch SAP CC365 Reporting Users or Sinch CCtr Reporting Users now has the Sinch CCtr Data Access or SAP CCtr Data Access right in the Access column and click Close.
Connections
To add rights for the tenant's user group to access reporting data:
- In CMC, select Connections either from the dropdown on the top left or from the icon list on the left.
- In the Connections view, right-click on Sinch SAP CC365 Connections (multi-tenant package) or Sinch CCtr Connections (single tenant package) and select User Security. The User Security view opens.
- In the User Security view, click the Add Principals button. The Add Pricipals view opens.
- From the left-side menu, select Group List and, in the list that opens, select Sinch SAP CC365 Reporting Users (multi-tenant package) or Sinch CCtr Reporting Users (single tenant package).
- Click the right arrow to add Sinch SAP CC365 Reporting Users or Sinch CCtr Reporting Users to the Selected Users or Groups list.
- Click the Add and Assign Security button. The Assign Security view opens.
- Select SAP CCtr Data Access (multi-tenant package) or Sinch CCtr Data Access (single tenant package) and click the right arrow to add it to the Assigned Access Levels list.
- Click OK. You are returned to the User Security view.
- Check that Sinch SAP CC365 Reporting Users or Sinch CCtr Reporting Users now has the SAP CCtr Data Access or Sinch CCtr Data Access right in the Access column and click Close.
Top Level Security Root Folder
-
Select Folders on Business Objects Central Management Console. In the Folders view right-click the Manage and select Top-Level Security and All Folders.
-
Select Everyone and select Assign Security.
-
Select the Advanced tab.
-
Click the Add/Remove Rights text.
-
Select General and select View objects right (tick the green column of View objects).
-
Click OK, and check that View objects is listed, and the status is green.
-
Click OK.
Application
Assign security at least for Web Intelligence, and additionally, for Design Studio if it has been installed and it is plannned to be used for making reports or monitoring views.
To assign security for Web Intelligence:
-
Select Applications on Business Objects Central Management Console.
-
In the Applications view right-click the Web Intelligence and select User Security.
-
Select Everyone and select Assign Security.
-
Select the Advanced tab.
-
Click the underlined Add/Remove Rights text.
-
Expand the Applications and set the following rights (tick the green column of the objects).
-
Documents – enable creation
-
Reporting – create and edit input controls
-
Reporting – enable merged dimensions
-
Reporting – enable formatting
-
-
Click OK and check that above objects are listed and status is green.
-
Click OK.
To assign security for Design Studio:
-
Select Applications on Business Objects Central Management Console.
-
In the Applications view right-click the Design Studio Runtime and select User Security. Note that the list of applications is not necessarily in alphabetical order.
-
Select Everyone and select Assign Security.
-
Select the Advanced tab.
-
Click the underlined Add/Remove Rights text.
-
Expand the Applications, select Design Studio Runtime and set the rights for Launch analysis application (tick the green column of the objects).
-
Click OK and check that above object is listed and status is green.
-
Click OK.