Using WhatsApp message templates
If your customers have given permission, you can send them messages using templates.
When your Sinch Conversation API WhatsApp account is set up, templates are created for you. To use these templates in Sinch Contact Pro, you must create WhatsApp reply templates in System Configurator (SC) using the template content you have received from Sinch. The Sinch Conversation API uses JSON-formatted template. For more information, including message types and their limitations, see WhatsApp Channel.
Sinch Contact Pro doesn't support dynamic content in WhatsApp templates (such as Dear {1},
please remember reserved service time at {2}
where {1} should be
replaced with name and {2} with time).
-
On the System Configurator main screen, choose .
-
Choose Add New.
-
Choose Reply Template and click OK.
-
In the Basics block, do the following:
-
Enter the name for the template.
-
Enter description. This field is optional.
-
Select the language used in template. This field is mandatory.
-
Choose WhatsApp for content type.
-
For the template to work in Sinch Contact Pro, you must add template_body and type to the template.
This is an example of a JSON template with added elements:
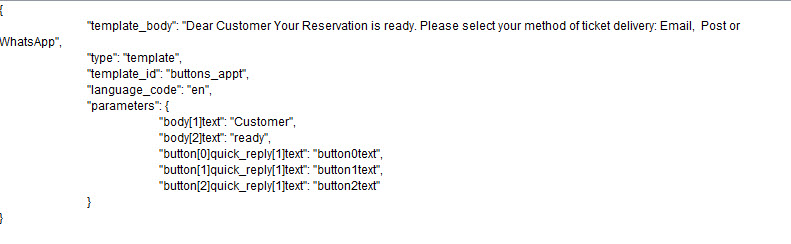
template_body This is used to display the template text in Communication Panel. type Enter template. template_id The same as name in Facebook API. language_code Language the template uses. For supported languages, see https://developers.facebook.com/docs/whatsapp/api/messages/message-templates#supported-languages. parameters Object presenting all elements of a WhatsApp template. Add the values to the parameters provided in the template: - In case of text, provide text content.
- In case of interactive content, such as documents, images, and videos, provide links.
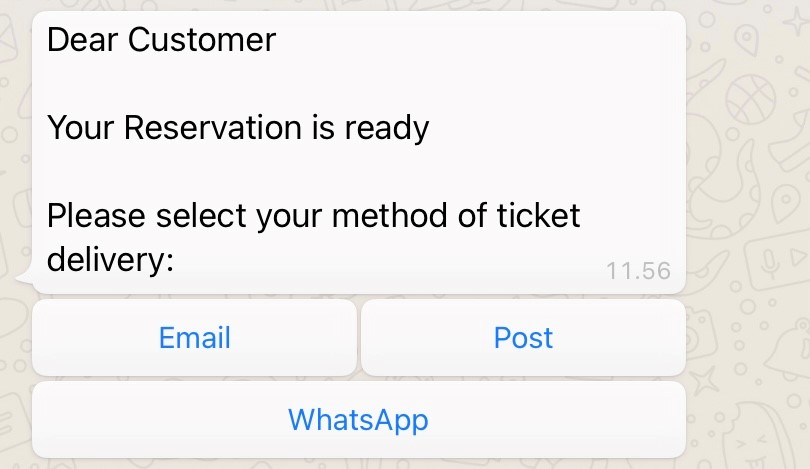
This is how the JSON template is displayed in Communication Panel and in the WhatsApp application.

-
- To enable agents to search for this template in Communication Panel, add the template name or other descriptive term as a keyword in the block Keywords.
-
In the Template Folders block, add the folders in which the template is available.
This is mandatory since reply templates must be linked to a folder.
-
Save the template.