Handle a Call
- Log in to Communication Panel.
- Select the queues where you are supposed to serve.
-
If you are automatically offered a conversation, you'll see information related to the conversation as well as the customer's phone number or email address displayed as a green link if it's found in the directory. To view customer information or the customer's recent conversations, click the link.
To accept the conversation, click the green Accept button. If auto-answering is used in your system, the conversation is accepted automatically and you don't need to accept it. To reject the conversation and return it to queue, click the red Decline button.
The Conversations view closes, and a queue call is returned to the queue and a direct call is disconnected.
If picking is used in your system, you need to click the Picklist button to display a list of conversations you can pick, and click the Pick button.
- After accepting:
- an incoming call, the information screen appears with the buttons:
Table 1. Button Description Recording See Record a Call. Join The button is enabled only when there is a call on-hold and the consultation call active. Hold Sets the current call on hold. You cannot start a direct call with an internal number when the current call is on hold but you can transfer or create a consultation call either internally or externally. To make the call active again, click the Resume button. Mute Mutes the call. The call screen indicates that your microphone is muted. To continue talking in the call, click Unmute. Hang Up Ends the call. - a campaign call, the preview screen appears with customer information. You can choose one of Exclude, Skip, and Call buttons. For more information, see Campaigns.
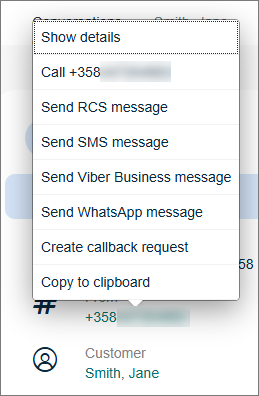
To send the customer a message, create a callback request, or copy their number to the clipboard, click on their phone number and select the relevant option:
- an incoming call, the information screen appears with the buttons:
-
To end the call, click the Hang Up button.
The active call view changes to the wrap-up view.
If the administrator:
- has defined an automatic wrap-up time for the queue, the conversation is wrapped-up automatically when the defined time has elapsed and the conversation is automatically closed. Before the wrap-up time expires, you can also click Close to end the wrap-up. The system then changes the conversation to the status of Handled.
- has defined a manual wrap-up for the queue, you need to click Close to end the wrap-up. The system then changes the conversation to the status of Handled.
Note:While a conversation is in wrap-up, you might not be allocated new conversations.